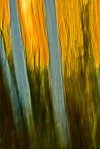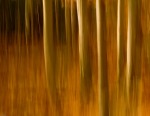
Since I first saw one of his geometric, mulitiform or color-field abstract paintings many years ago I have been deeply impressed by Mark Rothko’s work. As a photographer leaning toward the abstract, I am challenging myself to create photographs that borrow from Rothko’s style of painting.
While the characteristics of his works of this genre changed over the years, and included both color and greytone pieces, Rothko’s works of this type most frequently were comprised of two or three dominant planes of color or grey-tones that softly and subtly merge, complement or contrast one another, sometimes “divided” by narrower bands of other color or grey-tone. An example of this type of Rothko’s work can be seen at http://www.markrothko.org/dark-over-light-earth.jsp.
A combined exhibition of Rothko’s “grey” works and famed photographer Hiroshi Sugimoto’s seascape photographs was recently presented in London’s Pace Gallery, drew much critical acclaim, and spawned a book. So the concept of a photographer’s interpretation of or inspiration from Rothko’s work, or of parallels to be drawn between Rothko’s multiform paintings and the work of some photographers is not new.
In fact, for some time I have been taking panning or “swiping” shots with long exposures to create blurs of otherwise static or relatively static subjects, such as mountains, beaches, open bodies of water and other subject matter, like the one pictured above. To my eye, images of this nature are quite beautiful, stimulating and satisfying in their own right. However, though some may see parallels between images such as these and Rothko’s work in that they result in non-focused colors laid in blocks one on top of the other, this technique does not produce an image that is sufficiently “Rothkoesque”, to my way of thinking, to constitute a sufficient “homage” to Mark Rothko.
So I am now setting out to create a body of work, perhaps steeped in abstract landscape photography but perhaps not, that will satisfy my quest to do in photography a project with sufficiently reflects Rothko’s inspiration, and which is significantly different from any of the photography that I have found by others of this nature to be considered unique.
This will be a project which evolves over a period of time. From time to time I will post images from this project either here on my blog, or on my Facebook Page http://www.facebook.com/CarlRubinoPhotography. As the project attains a sufficient enough maturity, I will post some of the images to my website at http://www.carlrubino.photoshelter.com. At some point, if I feel the project warrants it, I may even launch a Kickstarter campaign in connection with the project to create and promote a sufficient exhibition of the work and, perhaps, a book.
Take care
Carl
Share this: Blog from www.carlrubinophotography.com
December 7, 2012 | Categories: Abstract Photography, Blurs, Contemplative Photography, Empty Mindedness, Impressionist Photography, impressionistic Photography, Painterly Photography, Technique, Themed Photography, Unique Art | 1 Comment

Panned photo of tree in Adirondacks results in painterly photo
“Birches Abstract #5″This image is created by panning or “swiping” the camera in a series of up and down vertical pans during a shutter speed of about 1 second or longer. The length of exposure and the speed of the pan are the most significant factors in determining the result. It takes many shots of varied shutter speeds and pan speeds to get a “keeper”. The “painterly” and impressionistic look of this photo is created in the camera, not in the software. The repeated and continuous “up and down” panning is what gives the photo the appearance of paint applied by a palette knife.
The trees are back lit. It was taken in the afternoon in fall, which makes for the color of the image. Little to nothing is done in Lightroom, other than a bit of exposure “tweaking” and, probably, a bit of saturation added.
I actually heard someone explaining to a friend at a cocktail party where this photo appeared on the wall that this was a print of an original painting made with a palette knife! When I told her that I couldn’t help overhearing her but, in fact, it was a photograph, she replied: “No it isn’t. I was an art major and I know a painting when I see one.”
She looked surprised when I explained that I was the photographer who took the shot. To which she replied: “Oh, well you must have Photoshoped it to get that effect” Of course, my response was: “No. It wasn’t done in Photoshop. It was done in the camera! I don’t even own Photoshop.” Even after I explained to her how I did it I still don’t think she believed me!!!
If you’d like to try this sort of thing, here are some suggestions for creating this type of photo:
1. Plan ahead. Think about how long the length of your pan should be so as to include only what you want in the photo. For a vertical pan of trees, for example, you may want to start at the bottom of the tree to include a bit of ground at its base (or not), and then swing upward, but not so high as to include a bright sky (as the dynamic range may be too great). But, having said that, you may want to try some that include the sky as it will give a far different result.
2. Experiment with different shutter speeds. You might start out a somewhere in the vicinity of 1/4 second, and progressively use a longer speed. You might like what you get in an exposure of several seconds.
3. Experiment with panning at different speeds. The shorter the exposure, the faster you need to pan in order to get the “blurred” effect. With a long exposure you can try several techniques – moving slowly in a single direction, moving up and down (or right and left) and back and forth repeatedly, or moving in many different directions during the exposure to name a few. Each technique will yield a far different result.
4. Don’t feel that you aren’t getting it if you don’t produce results you don’t like right away. It takes a while to get the hang of the combination of a good subject matter choice, the right lighting, and the correct combination of shutter speed and pan speed (not to mention direction(s) of panning). And, even when you get the hang of it I can guarantee you that you will have far more that make you hit the “delete” button than don’t.
5. As for subject matter, it’s as wide as your imagination. I’ve used these techniques on trees (singularly as well as forests), lakes, mountains, people – you name it.
So, there you go. Create great impressionistic painterly photographs using no more than a lengthy shutter speed and some movement. Try it in all directions, with different speeds, repeated and not. And, when you get done with that, try just shaking the camera, zooming a zoom lens in or out, or any other movement you can come up with. This is a great excuse to take your camera off your tripod (where everyone’s been telling you it has to be), and also saves the day if you find yourself at a suitable location without a tripod.
If you like this, you can see some other examples in the Trees Gallery and “In The Spirit Of A Tree” Exhibition Portfolio on my website http://www.carlrubino.photoshelter.com or on my Flickr site at www.flickr.com/photos/carlrubinophotography Let me know if you get anything you like out of this. Hope it helps.
Take care
Carl
Share this: Blog from www.carlrubinophotography.com
November 3, 2010 | Categories: Blurs, Camera Motion, Impressionist Photography, impressionistic Photography, Painterly Photography, Technique | Tags: abstract, blurred trees, camera motion, creative, forest, impressionist, impressionistic, painterly, painterly photograph, panning, panning blurs, shutter speed, swipe, swiping, technique, tree blurs, trees | 1 Comment

“Wells Hill Pass in Fall #1”
This photograph is taken in the Adirondacks in the foothills of the Jay Range of Mountains between Lewis and Upper Jay, NY. But any forest, or even trees in your backyard will work.
Here’s how it’s done. The photo is created by panning the camera vertically during a shutter speed of about 1/4 of a second or longer. Keep in mind that the brighter the lighting, the shorter the shutter speed and/or smaller an aperture you’ll need for a “correct” exposure.
If it’s bright, and you can’t set the shutter speed at a slow enough setting to get the “blur” (using just shutter speed and aperture as your exposure controls), use a neutral density filter and/or a polarizing filter to allow for a slower shutter speed and correct exposure.
The length of exposure and the speed of the pan determine the result. It takes many shots of varied shutter speeds and pan speeds to get a “keeper”.
In the image above, the trees are side lit. It was taken late in afternoon in fall, which makes for the color of the image. Taking it at times when the leaves are of different coloring, or with different trees, will make a significant difference.
Try it with all kinds of trees. Try it with single trees, small groups of trees, dense forests, sparse woods.
This image was made with a DSLR, but it can also be done with a cell phone camera, though the quality will not be as great. Little to nothing is done in Lightroom. It is all about in-camera technique and experimentation.
The more you work at it, the better you’ll get. Let me know how you do with this. The image at the top of my blog is taken using these techniquesYou can see many other examples of this type of work in the Trees Gallery and the “In The Spirit Of A Tree” Exhibition Portfolio on my website http://www.carlrubino.photoshelter.com
Take care – Carl
Carl
Share this: Blog from www.carlrubinophotography.com
November 1, 2010 | Categories: Blurs, Camera Motion, Impressionist Photography, impressionistic Photography, Painterly Photography, Technique | Tags: abstract, blurred trees, camera motion, creative, forest, impressionist, impressionistic, painterly photograph, panning, panning blurs, shutter speed, technique, tree blurs, trees | 2 Comments


